by Tianna DuPont, WSU Extension; Troy Peters, Biological Systems Engineering; Lee Kalcsits, WSU Horticulture. Project partner Cascadia Conservation District. November 2022
Irrigation sensors are important tools for fine-tuning irrigation. Kicking the dirt or doing a “the-grass-looks-green irrigation check” is not always enough. Old pear orchards have deep roots, and what is happening in the top two inches of soil can be quite different from what is happening two feet underground. Irrigation sensors help you make more informed irrigation decisions based on soil moisture conditions in the root zone.
Types of sensors
Soil Water Tension
Soil water tension or soil water potential refers to how hard a dry soil is pulling (sucking) on soil water and is measured using vacuum or pressure units, such as pounds per square inch (psi), kilopascals (kPa), or centibars (cbar). Low tension is associated with a full soil, and high tension is associated with a very dry soil. The advantage of using soil water tension or soil water potential sensors is that the tension at which irrigation water should be turned on is a relatively static number when compared to soil moisture content (volume) sensors. This means that it is easier to compare moisture contents between different sites.
Tensiometer: Tensiometers are an example of a soil water tension sensor. Tensiometers are sealed plastic tubes that have a porous ceramic tip on the end (Figures 1 and 2). The tube is buried with good soil contact and then filled with water. As the soil dries, it pulls the water from the tip, creating a vacuum/tension that we can measure with a tension gauge. When the soil is full (100% of field capacity), tension will be at or near zero. Trees generally experience water stress when the probe reads 50–70 centibars.
 Figure 1. Tensiometer. Photo credit: Tianna DuPont.
 |
 |
Figure 2. The porous ceramic tip of a tensiometer (left) and one that has been broken to show the inside (right). Photo credit Troy Peters.
Granular Matrix Sensors:Since water conducts electricity, these sensors use the resistance in a known material surrounded by a uniformly packed media to estimate the soil water tension (Figure 3). Granular matrix sensors use similar units as tensiometers and are usually less expensive than tensiometers.

Soil water potential sensor: Soil water tension can also be referred to as soil water potential. Additional sensors using proprietary methods are also available (Figure 4). These newer sensors are usually set up to be plug and play with dataloggers produced by the same manufacturer.
Figure 4. A TEROS 21 soil water potential sensor manufactured by METER Group (Pullman, WA). Photo credit: Troy Peters.
Soil Water Content
Soil water content is the actual amount of water in the soil. It is most often measured as a percentage of water by volume. cm/cm, m/m, cm3/cm3, m3/m3, in/in, or ft/ft are all equivalent measures of soil water content. These can be multiplied by 100 to show the soil water content as a %, or multiplied by 12 to get inches of water per foot of root zone soil depth (in/ft). in/ft is a convenient measurement since it can be multiplied by the root zone depth (in ft) to get the total inches of water held in the root zone.
Capacitance: Capacitance sensors measure the ability of soil to hold an electrical charge for a short period of time (Figure 5). This is the capacitance, or dielectric, of the soil. Most capacitance probes have a positive and a negative plate with a space in between (the dielectric). The probe measures the change in the soil’s ability to conduct electricity due to an increase or decrease in the ions from soil water when it dries or becomes moist. Advantages of these probes include the ability to have multiple sensors at different depths and the ability to connect to a telemetry unit which transmits the information to a computer. A disadvantage is that bulk density and soil texture will affect readings, so proper calibration is necessary.
 |
 |
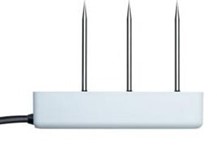
Time domain reflectometry (TDR): These sensors measure the travel time and reflectance of an electrical pulse as it travels down a conductor that is buried in soil, which are a function of the soil’s dielectric and thus the soil water content. These sensors usually have two or three spikes on them (Figure 6). The electrical pulse is sent down to the center conductor and the response is measured by the outside conductors (three probes) or by the conductor next to it (two probes). Like capacitance probes, TDR sensors measure soil water content, usually as a percentage water by total soil volume. TDR sensors measure the soil water content only at the location of the sensor so multiple depths will require multiple sensors.

Sensor placement
There are two strategies to consider when placing an irrigation sensor in the field. One strategy is to pick the most representative part of the field. With this strategy the manager chooses a location with the average soil type and texture in the field. This is a useful strategy when an orchardist’s goal is to limit water use. The other strategy often used is to choose a location with the lowest water holding capacity in the field (e.g., the sandiest section). In this scenario, the operator manages for the part of the field that will dry out the quickest and consequently the rest of the field receives water before it dries out. This strategy aligns with fruit size and tree growth maximization goals. It is not recommended to place sensors in an area that is always waterlogged. Avoid placing sensors in outside rows of trees which generally use more irrigation than interior orchard trees.
Deciding When to Water
When you install a new irrigation sensor you will need to calibrate it by setting the full and refill points.
Step 1: Determine when the soil is full (field capacity).
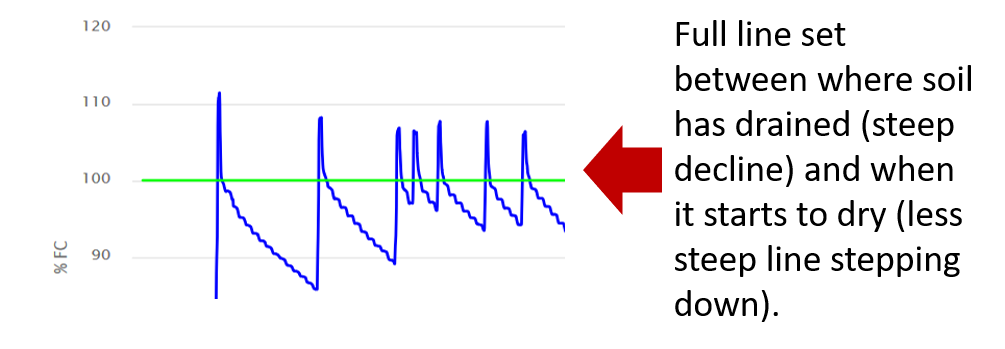
To calibrate a sensor, the first step is to determine what is “full,” or the field capacity for a given soil and soil probe. Field capacity is the maximum amount of water the soil can hold after it has drained but not begun to dry. An easy way to determine the full point is to take a measurement when the soil profile is full. The soil is often full in the Pacific Northwest in the early spring as soon as the soil thaws as a result of winter snow melt and spring rains. Taking a measurement at this time will indicate the full point. If installed in the spring, completing several irrigation cycles can help designate the full point using the dynamics of the soil moisture signal itself (Figure 7).
Setting full point example. Using the soil moisture output from your sensor you can see that there is a peak when irrigation occurs and then the soil moisture level line drops very quickly before starting to step down slowly. The quick drop is the soil draining the free water. The line steps down slowly as the soil is able to hold the water and the soil then starts to dry. Generally, the full point is set at the transition between when the line drops very quickly and when it starts to step down.

Step 2: Determine when to irrigate (re-fill point).
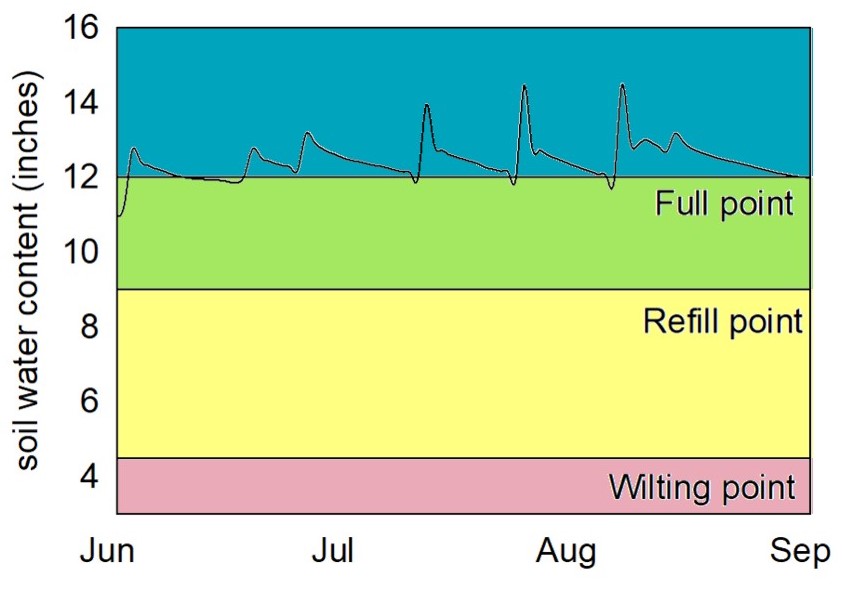
The point where trees begin to experience water stress (i.e., the refill point) can be estimated based on the previously measured field capacity (above), the soil’s available water capacity (AWC), and the recommended maximum allowable depletion (MAD). For tree fruit, the MAD is generally 50% of the AWC (Figure 8).
Example determination of re-fill point. In this example field the soil moisture probe is 36 in long.
- Determine the available water holding capacity: The grower looked up the available water capacity for his soil on the web soil survey < https://websoilsurvey.sc.egov.usda.gov/> The soil at the sites was a Birch Loam with available water capacity of 0.19 cm/cm. Of course, cm/cm is equivalent to in/in. So,

- Determine field capacity: Field capacity is determined based on the soil moisture measured when the soil has been fully irrigated and had time for the excess water to drain through but not dried. At this site when the soil was full there was approximately 12 in of total water in the profile in the top 36 in.

- Determine the wilting point: The wilting point is the point where none of the water left in the soil is available to plants.

- Determine the refill point:

Note that to convert from a measurement of percentage soil moisture to inches of water, simply multiply by the soil depth that the measurement represents. For example, if there are three soil moisture sensors at 6, 18, and 30 inches deep and the measurements for percentage soil water are 25%, 30%, and 35%, respectively, then each measurement is multiplied by the 12 inches of soil that it represents (25% water × 12 inches = 3.0 inches of water in the top foot of soil, 30% water × 12 inches = 3.6 inches of water in the middle foot of soil, and 35% water × 12 inches = 4.2 inches of water in the bottom foot of soil). These would then be added together to get the total amount of water in the soil profile: 3.0 + 3.6 + 4.2 = 10.8 inches of water in the 36-inch root zone.
If you do not know what the soil’s available water capacity (AWC) is, then a rough estimate of the refill point is about 75–80% of the full point (field capacity). For example, in the scenario above the field capacity is 12 inches and the 75% refill point is set at 9 inches of soil water. Field capacity and refill points can be revised and refined based on experience and observations in the field over time.
Example Sensor Outputs

Many modern sensors are connected to telemetry which transmits the data from the sensor in the field (Figure 9) to where it can be accessed on a computer or app (Figures 10, 11, and 12). After calibration, most software provides users with graphs illustrating the soil moisture level compared to the full and refill points set by the user. Graphs often illustrate average soil moisture and soil moisture at multiple sensor depths.

 Figure 11. Example sensor output from Sentek using IrriMAX Live software. Graphic at top shows soil moisture at each sensor depth. Graphic at bottom shows the total soil moisture compared to user-designated full point (blue) and refill point (green to yellow). User can choose to display in centimeters or inches. Available with soil probes from Sentek.
Figure 12. Example sensor output from Davis Mobilize. Graphic shows soil moisture percentage for each soil depth where a sensor is located. The green area indicates full soil. Where the green area meets yellow is the refill point. Locally available from Irrigation Technology and Control.
How soil moisture sensors can help
In pears managers often irrigate in standard 12- or 24-hour sets once per week. But irrigation needs can vary greatly from year to year as well as over the course of the season.
In a case study conducted in 2019 we followed soil moisture and fruit quality in two adjoining blocks where the grower irrigated using weekly sets compared to when he looked at the output from his irrigation sensors. Using outputs from the irrigation sensors, the grower was able to maintain soil moisture between the full and refill points in the area of the block designated as experimental. In comparison the grower standard of irrigating weekly using 12- or 24-hour sets kept soil overly moist with moisture above the full point (field capacity) (Figure 13). In the section of the field where irrigation sensors were used to determine watering frequency (Figure 14), the amount of cork was reduced, resulting in higher packouts (79% vs 70%) and 3,660 lb fewer culls due to cork. See Improving Irrigation Efficiencies in Pears Case Studies (DuPont et al. 2021) for details.
Troubleshooting sensors
When soil moisture sensors are giving no reading or a reading that does not make sense there are multiple common problems to check:

- Is the battery dead?
- Is the station still on the post?
- Is the solar panel charging the battery extremely dirty (e.g. covered in kaolin clay) and consequently no longer providing power?
- Is the cable cut? Occasionally cables too close to trees to be pruned etc will end up with cut cables.
- Are the sprinklers close to the irrigation probe working properly? If sprinklers are clogged, not rotating properly or blocked by weeds there may be a dry spot close to the sensor which does not represent the rest of the field (Figure 15).
- Is the probe installed in an area that receives full overlap coverage from the sprinklers in the field? If a probe is installed behind a tree or in another area which does not receive full coverage the reading will not be representative.
- Did you just cultivate? Cultivation too close to the probe can disturb the soil leaving air spaces which change the reading.
- Have you waited for the system to update? Depending on your settings the system may update only hourly or less often. Check the sensor output date/time. If you are putting on water now and no change is showing in the ap it may just need time to update.
- Since the probe was first installed has foliage grown in the way, potentially blocking the signal?
Acknowledgments
This article is part of a project funded by the Fresh Pear Research Committee and the Bonneville Environmental Foundation with in-kind support from Wilbur Ellis, Sentek, and Irrigation Technology Control. Thank you to project cooperators Cascadia Conservation District, Larry and Renee Caudle, Erica Bland, Brandon Long, Aaron Hargrove, Phil Guthrie, and Bob Gix.
Additional Resources
Peters, T., D. Kefyalew, and L. Nelson. 2013. Practical Use of Soil Moisture Sensors and Their Data for Irrigation Scheduling. Washington State University Extension Publication FS083E. Washington State University. https://s3-us-west-2.amazonaws.com/treefruit.wsu.edu/wp-content/uploads/2017/12/FS083E.pdf.
DuPont, T., and T. Peters. 2022. Evaluating Your Pear Irrigation System. Washington State University. https://treefruit.wsu.edu/orchard-management/irrigation-management/evaluating-irrigation-systems/.
DuPont, T., T. Peters, and L. Kalcsits. 2021. Improving Irrigation Efficiencies in Pears Case Studies. Washington State University. https://treefruit.wsu.edu/orchard-management/irrigation-management/improving-irrigation-efficiencies-in-pears-case-studies/.
DuPont, T. 2020. Using Irrigation Sensors Video. Washington State University. https://treefruit.wsu.edu/videos/using-irrigation-sensors-troy-peters/.
DuPont, T. 2020. Irrigation Sensors with Jac LeRoux Video. Washington State University. https://treefruit.wsu.edu/videos/irrigation-sensors-with-jac-leroux-improving-irrigation-efficiency-in-pears-virtual-field-day/.
DuPont, T. 2020. Cost Share Availability Video. Washington State University, Cascadia Conservation District. https://treefruit.wsu.edu/videos/cost-share-availability-irrigation-efficiencies-virtual-field-day/.
References
DuPont, T., T. Peters, and L. Kalcsits. 2021. Improving Irrigation Efficiencies in Pears Case Studies. Washington State University. https://treefruit.wsu.edu/orchard-management/irrigation-management/improving-irrigation-efficiencies-in-pears-case-studies/.
Contacts
WSU Extension Specialist, Tree Fruit
tianna.dupont@wsu.edu
Office: (509) 293-8758
Mobile: (509) 713-5346
Biological Systems Engineering
Washington State University
troy_peters@wsu.edu
Endowed Chair Tree Fruit Physiology
Washington State University
lee.kalcsits@wsu.edu
Fruit Matters articles may only be republished with prior author permission © Washington State University. Reprint articles with permission must include: Originally published by Washington State Tree Fruit Extension Fruit Matters at treefruit.wsu.edu and a link to the original article.


